Sources
Hardware: Download md5:710ce05e5f95076b5e42b2feaf8a4de4
Software: Download md5:613621b833102e7ccde7b50c5f5ef6a7
Downloads
note: normally, we upgrade or fix brick are using Firmware.
Flash Image is a clone of the full flash,for professional usage only.
Firmware: Download(2016.12.24) md5:2a6b06ee7ec7b3fa6fd3e9eeb5c83531
Flash Image: Download md5:f4c527a1e563d0ad7ef9ab0b5e0b35c6
Toolchain: Download (Ubuntu 14.04 x64)
Datasheet: Download
Links
VoCore2 + Dock Ultimate version makes it easy to use.
VoCore Camera Tiny camera supports h264 + microphone.
Details
VoCore2 is a successor of VoCore, make it more fast, stable, but still same size.
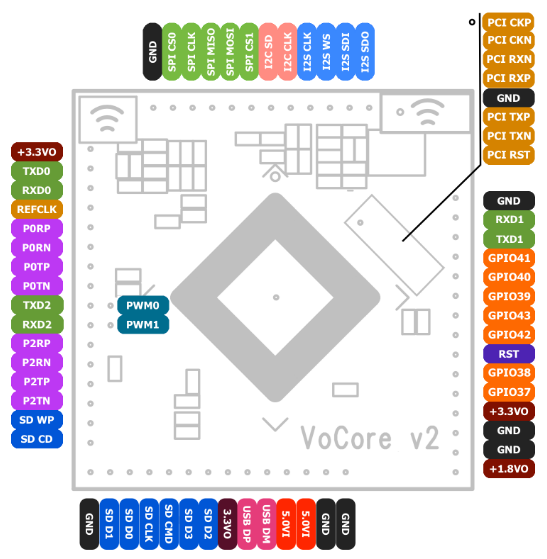
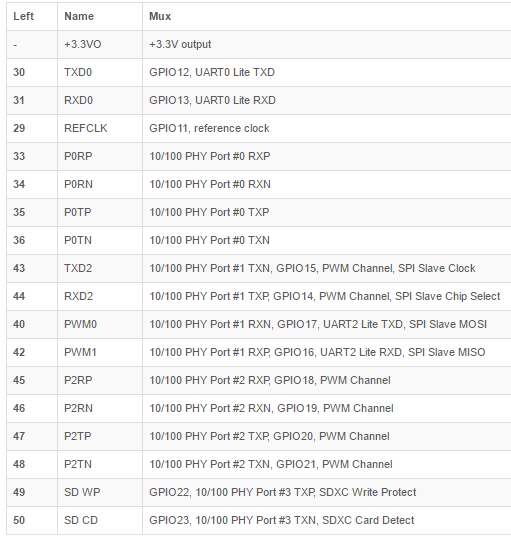
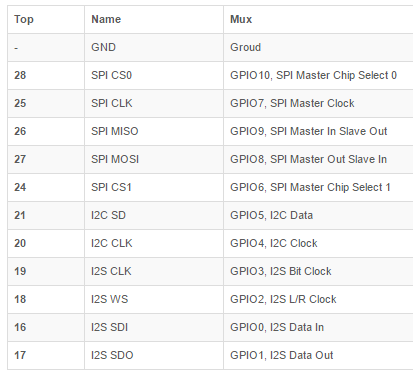
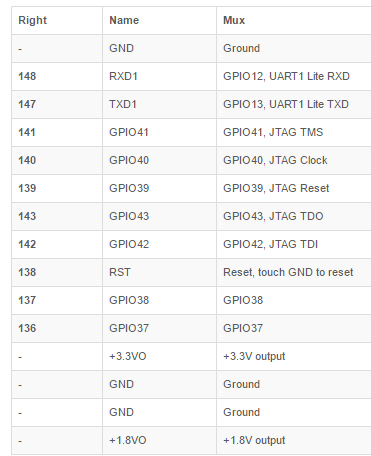
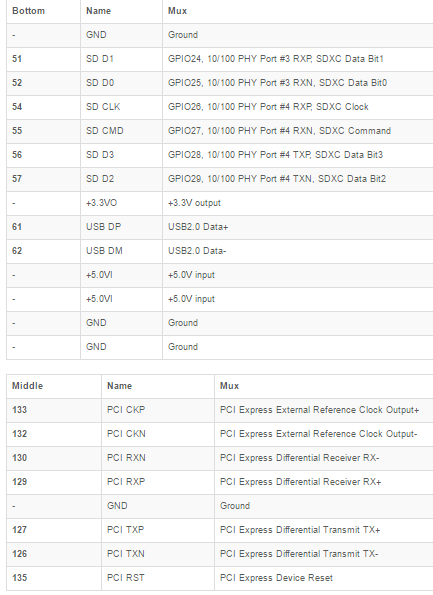
pin id is same as the one on MT76x8 datasheet in source
Tutorials
Connect to Power
1. connect to 3.6V~6.0V and GND with a stable power source, such as USB charger.
note: be careful, high voltage will damage your VoCore.
2. if everything works, after 30 seconds, you will find VoCore2 in your computer hotspot list.
3. connect to VoCore2 hotspot.
4.a using ssh or putty or similar tools login to VoCore2(root/vocore).
4.b using USB2TTL, please check manual in Download section.
important : UART speed is 115200bps, 8bits, no even, 1 stop bit
video tutorial: youtube
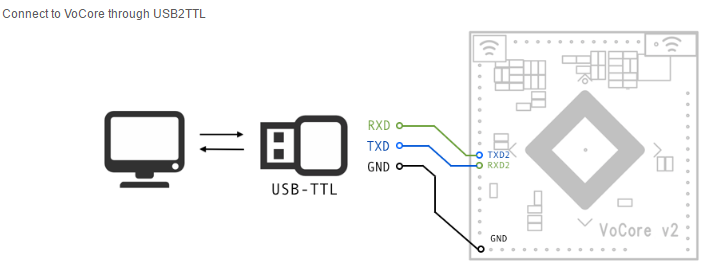
1. connect USB2TTL.TXD to VoCore2.RXD2, USB2TTL.RXD to VoCore2.TXD2,
USB2TTL.GND to VoCore2.GND.
2. setup your serial application(such as putty for windows, kermit for mac,linux)
in your computer to 115200bps, 8 data bits, no even, 1 stop bit.
3. power on your VoCore2, no you should find some text output.
Setup AP + STA Mode
video tutorial(require USB2TTL): youtube
1. connect to your VoCore through USB2TTL.
2. run command in console(UART console).
3. setup network to enable dhcp(get ip from your hotspot).
uci delete network.wwan
uci set network.wwan=interface
uci set network.wwan.proto=dhcp
uci commit
4. setup firewall to enable access to internet through your hotspot.
uci del_list firewall.@zone[1].network=wwan
uci add_list firewall.@zone[1].network=wwan
uci set firewall.@zone[1].input=ACCEPT
uci set firewall.@zone[1].output=ACCEPT
uci set firewall.@zone[1].forward=ACCEPT
uci set firewall.@zone[1].masq=1
uci set firewall.@zone[1].mtu_fix=1
uci commit
5. setup wireless to enable ap+sta mode.
uci set wireless.sta.ssid="[TARGET AP SSID]"
uci set wireless.sta.key="[TARGET AP PASSWORD]"
uci set wireless.sta.network=wwan
uci set wireless.sta.disabled=0
uci commit
note:replace [TARGET AP SSID] to the target ap ssid you want to connect to,
[TARGET AP PASSWORD] is its password.
5. restart your network, it will work.
/etc/init.d/network restart
6.(option) once ap+sta is totally up, disable it in config,
so if next time your target ap is missing,
you still able to connect to VoCore2.
sleep 10
uci set wireless.sta.disabled=1
uci commit
note: better copy the three lines to /etc/rc.local
Upgrade VoCore2 Firmware
1. download the latest firmware(not the flash image) in this page Download section.
2. connect to your VoCore hotspot, open browser view 192.168.1.1 or 192.168.61.1.
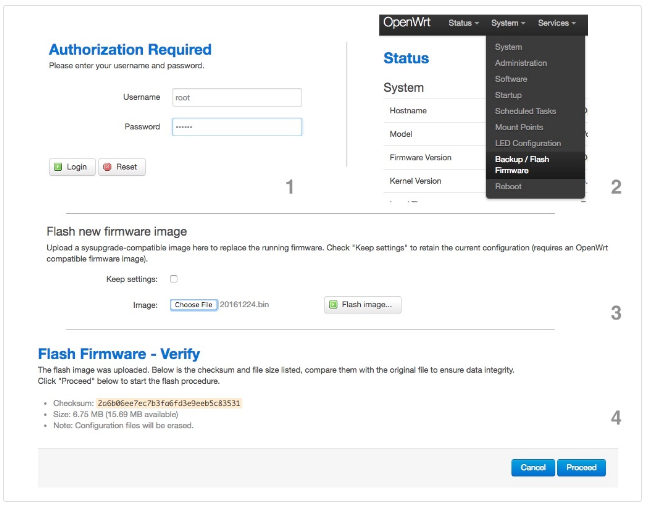
3. LuCI console using username: root, password: vocore, click on "Login" (picture part 1).
4. select "System" -> "Backup/Flash Firmware" (picture part 2).
5. click on "Choose File", choose your downloaded firmware(again,
not the flash image, picture part 3),then click "Flash Image".
6. it will upload the firmware to your VoCore2, takes a few seconds, check if the md5 matched.
(picture part 4)
7. if everything ok, press "Process".
8. normally it will take 2~3 minutes, please wait until it is ready.
note: if power cut off during the upgrade process, your VoCore2 will brick,
check "Fix Bricked VoCore2"
Compile OpenWRT for VoCore2
video tutorial: youtube
1. install Ubuntu 14.04 64bit Server to Virtual Machine.
2. in virtualbox, we will need install some packages to compile openwrt:
sudo apt-get install gcc g++ binutils patch bzip2 flex bison make autoconf
gettext texinfo unzip sharutils subversion libncurses5-dev ncurses-term
zlib1g-dev libssl-dev python
3. download openwrt at "Sources" section in this page, software part.
4. call "tar -jxvf openwrt.tar.bz2" to uncompress the package.
5. call "make menuconfig" in the openwrt folder, configure openwrt in menu,
choose MT7688/28/VoCore2 in menu.
6. call "make" in the openwrt folder, start the make process
Compile your App for VoCore2
1. compile openwrt for VoCore2, it will create toolchain or download it at
Downloads/Toolchain (for Ubuntu 14.04 64bit).
2. make a simple code in C, compile it in command line.
/path.to.your.toolchain/bin/mipsel-openwrt-linux-gcc -g yourcode.c -o yourcode
3. after this, you will get an executable file named "yourcode", use scp, copy it to your VoCore2
4. in VoCore2, call chmod +x yourcode, after that, you can run it in VoCore2, call ./yourcode
Upload Firmware
1. upload firmware through luci, please read manual in Download section.
2. upload firmware through console, connected to VoCore hotspot.
(1) copy from pc to VoCore[operate in PC]: scp [your firmware].bin
Questo indirizzo e-mail è protetto dallo spam bot. Abilita Javascript per vederlo.
.1:/tmp/vocore2.bin
here is two choices, 2.a will erase all data/config you write to VoCore,
2.b just upgrade the firmware but keep them.
(2.a) write to VoCore nor flash[operate in VoCore]: mtd -e firmware write /tmp/vocore2.bin firmware
(2.b) system upgrade VoCore nor flash[operate in VoCore]: sysupgrade /tmp/vocore2.bin firmware
(3) wait until mtd done, reboot your VoCore.
note: if you want set your VoCore back to first time boot up, call "firstboot" in console.
Fix Bricked VoCore2 (uboot alive)
1. connect your VoCore2 to computer through USB2TTL(UART2 RXD2+TXD2+GND).
2. open tty tools(must have kermit protocol), such as kermit, ckermit.
3. power up your VoCore, once you find: "0: Load system code then write to Flash via SERIAL.",
press '0'.
note: VoCore will show "## Ready for binary (kermit) download to 0x80100000 at 115200 bps..."
note: kermit: press Ctrl and '' same time then press 'c', you will switch to kermit command console.
5. send upgrade firmware to VoCore, after that, back to VoCore uboot console.
note: kermit: call "send path/to/your/upgrade/file/on/pc.bin" to send firmware, around 10 minutes,
once it finished, call 'c' back to console.
6. wait around 20~30 seconds, firmware uploaded, your VoCore will reboot.
Fix Bricked VoCore2 (uboot dead)
1. You must have another VoCore/VoCore2 or one flash loader and six wires.
2.1 using another VoCore/VoCore2 to recover your bricked VoCore2.
2.1.a coming soon...
2.2 using flash loader to recover your bricked VoCore2.
2.2.a disconnect VoCore2 from power;
2.2.b connect VoCore2 GND to flash loader GND;
2.2.c VoCore2 +3.3V to flash loader +3.3V;
2.2.d VoCore2 SPI MISO -> flash loader SPI MOSI;
2.2.e VoCore2 SPI MOSI -> flash loader SPI MISO;
2.2.g VoCore2 SPI CS0 -> flash loader SPI CS;
2.2.h VoCore2 SPI CLK -> flash loader SPI CLOCK;
2.2.i VoCore2 RST -> VoCore2 GND; (keep VoCore2 in reset mode)
2.2.j now, download then send "Flash Image" to VoCore2.2.
2.2.k remove wires, connect VoCore2 back to power, everything should back normal.
3. option: better to upgrade your firmware after recover, Flash Image is out of date.
Enable another antenna on VoCore2(standard version only)
On VoCore2 standard version we have another antenna, default it is power off status
(to avoid two antenna cross-talk to each other), if you have a external U.FL antenna,
you can connect it to VoCore2,
convert it from a portable router to a full function 802.11n router,
maxmize its speed and signal strength.
note: suggest distance between two antennas is > 6cm
1. download a factory setting read/write tool to /tmp/ on VoCore, chmod +x /tmp/factory.
2. we run the following script to enable second antenna.
enable second antenna:
/tmp/factory 0x34 0x22 > /tmp/mtd2.tmp
mtd -e factory write /tmp/mtd2.tmp factory
disable second antenna:
/tmp/factory 0x34 0x11 > /tmp/mtd2.tmp
mtd -e factory write /tmp/mtd2.tmp factory
3. restart wireless driver is necessary(better to reboot).
call "wifi" or "reboot" on VoCore2.
Directly write to memory/register
We made a simple tool for this, download here, its name is "mem",
put the executable file into /bin/ in VoCore2.
1. read from register/memory, for example: 0x10000060, pin control register
example: mem 0x10000060
2. write to register/memory, must in 32bits(4bytes)
example: mem 0x10000064 0x05540555
here is an example bash script flash the LED every second on VoCore2
mem 0x10000064 0x05540555; mem 0x10000604 0x1000; while [ 1 ];
do mem 0x10000634 0x1000; sleep 1;mem 0x10000644 0x1000; sleep 1; done