Note: This product is now only available by large-volume special order. Please contact us for more information.
Overview
The Orangutan LV-168 robot controller, the fourth release in our line of
Orangutan robot controllers, is a complete control solution for small robots powered by two or three NiMH cells (or similar batteries). The small (2.15x1.9)
module includes a powerful Atmel ATmega168 AVR microcontroller, two bidirectional motor ports each capable of
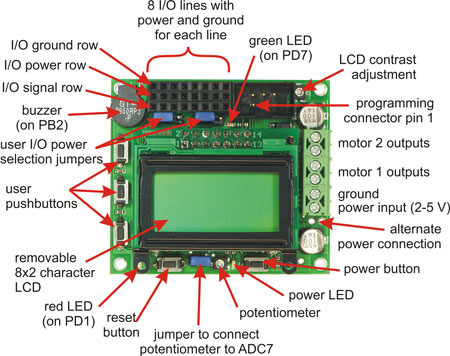
providing 2A (continuous), a removable 8-characterx2-line
liquid crystal display, a buzzer, three user pushbutton switches, and two user
LEDs. Eight general-purpose I/O lines with up to eight analog input channels
allow for adding sensors or expanding the system.
 |
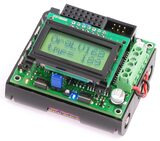
Orangutan LV-168 features (top view). |
|---|
The Orangutan LV-168 incorporates a step-up voltage regulator that generates
5V from the lower input voltage, enabling the mega168 to run at its full speed of 20MHz and allowing the use of sensors that require 5V. Two discrete H-bridges using low-voltage MOSFETs allow efficient control of two bidirectional DC motors drawing up to 2A each (continuously). The motor drivers can briefly deliver up to 5A each, but each motor is protected by a resettable fuse that is triggered by excessive temperature. If a motor draws much more than 2A for more than a few seconds, the voltage to the motor will be reduced, but normal operation will resume once the board has cooled down. An on-board temperature sensor can be connected to ADC6 for some (limited) feedback about the board temperature.
Like our original Orangutan, the Orangutan LV-168 is based on Atmel#8217;s mega168 AVR microcontroller, which
features 16Kbytes of flash program memory, 1024bytes of SRAM, and
512bytes of EEPROM. Because the user has direct access to the microcontroller, any development software for Atmel#8217;s AVR microcontrollers,
including Atmel#8217;s free AVR Studio and the WinAVR GCC C/C++ compiler, is compatible with the Orangutan LV-168. An in-circuit programmer, such as our USB AVR programmer, is required for programming the Orangutan LV-168; we offer a combination deal that lets you save when you buy a programmer with your Orangutan. We provide an extensive set of software libraries that make it a breeze to interface with all of the integrated hardware. These libraries come with a number of sample programs that demonstrate how to use the various components on the Orangutan LV-168. This robot controller is also compatible with the popular Arduino development platform.
The Orangutan LV-168 is designed to operate off of three NiMH cells, which corresponds to a voltage range of 2.5-4.5V. In a typical application, you might power your Orangutan LV-168 with three AA batteries, for example. However, the unit can operate from two or four NiMH cells with some limitations. At lower voltages, the effectiveness of the motor drivers will be reduced, and the 5V step-up regulator#8217;s output current will be reduced. Beyond 5V, the step-up regulator will cease operation and the input voltage will show up on the Vcc line; the components on the board can operate to 5.5V, but some sensors you use might have a 5.25V limit.
The Orangutan LV-168 matches the outline of a 3 AA battery holder almost perfectly, allowing you to combine the two into a single, compact unit.. Such a battery holder or a pre-assembled pack of similar size (often available as a cordless phone battery pack) will help you get up and running quickly.
Main Features
- overall unit dimensions: 2.15x1.9
- input voltage: 2-5 V
- 2 bidirectional motor ports (2 A continuous per channel, 5 A maximum per channel)
- programmable 20 MHz Atmel ATmega168 AVR microcontroller (16 KB flash, 1 kB SRAM, 512 bytes EEPROM)
- 8 general-purpose I/O lines, 6 of which can be used as analog input channels
- 2 additional analog input channels (ADC6 amp; ADC7) can be accessed on the board
- removable 8-characterx2-line LCD
- buzzer tied to one of the mega168#8217;s hardware PWMs
- 3 user pushbutton switches
- 2 user LEDs
- temperature sensor optionally connected to ADC6
- user potentiometer optionally jumpered to ADC7
- comprehensive user#8217;s guide